Learn how to safely and effectively install a GE Profile window air conditioner. This comprehensive guide covers everything from preparation to security, ensuring a cool and comfortable home.
As the summer heat intensifies, a window air conditioner becomes a necessity for maintaining a comfortable home environment. GE Profile AC units are a popular choice, known for their efficiency and smart features.
However, proper installation is crucial for optimal performance and safety. This guide provides a detailed, step-by-step process for installing a GE Profile AC unit in your window, ensuring a cool and secure living space.
Before You Begin: Preparation is Key
Choose the Right Window: Select a window that's appropriately sized for your AC unit. GE appliances notes that window air conditioners are designed for standard double-hung or single-hung windows.
Ensure the window is in good condition, free from rot or damage, and strong enough to support the weight of the unit. It’s also advisable to check with your landlord or building management to confirm that window ACs are permitted. A window in a partially or fully shaded area is ideal to minimize the unit's workload.
Gather Your Tools: Having the right tools on hand will streamline the installation process. According to GE Appliances, you’ll need:
- Phillips head screwdriver
- Drill with a 1/8 inch drill bit
- Pencil
- Tape measure
- Level
- Scissors or a knife
- Weather stripping
Safety First: Before you start, ensure the area beneath the window is clear of people or objects. Also, it's best to have someone assist you, as AC units can be heavy and awkward to handle.
Step-by-Step Installation
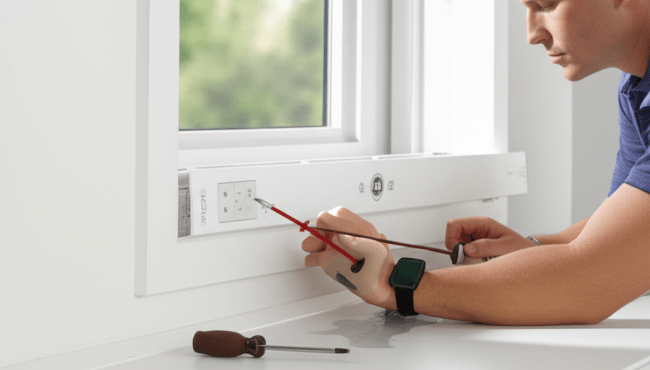
Prepare the AC Unit: Install the top mounting rail to the AC unit using the provided screws.
Prepare the Window: Apply weather stripping to the top and bottom edges of the window frame. This will help seal the area and prevent air leakage.
Install Side Curtain Panels: Slide the side curtain panels into the rails on each side of the AC unit. Then, install the curtain frames, ensuring they snap into place.
Position the AC Unit: With the help of your assistant, carefully lift the AC unit and set it into the window opening, centering it. The front edge of the bottom mounting rail should rest against the back edge of the windowsill.
Secure the Unit: Close the window, ensuring the front edge of the top mounting rail is in front of the window. The AC unit should be level or tilted slightly outwards for proper drainage.
Fasten Side Panels: Extend the side panels to fill the window space. Drill pilot holes and secure the side panels with screws.
Install Support Brackets: Loosen the screw on the side of the unit and slide the side bracket over it, ensuring it rests on the windowsill. Tighten the screw and use a drill to create pilot holes through the bracket into the windowsill. Secure the bracket with screws. Repeat on the other side. For added safety, consider using an air conditioner support bracket. These brackets attach to the outside of the unit and the house, providing additional support and security. Non-screw brackets that utilize gravity and physics are also available.
Seal and Insulate: Measure and cut adhesive-backed foam sheets to cover and insulate the curtain panels. Apply weather strips to the sides of the curtain frame to seal any gaps.
Install Window Lock Bracket: Install the window lock bracket on top of the bottom window using a screw. Cut the foam top window gasket to fit the window width and insert it between the glass and the window to block outside air and insects.
Safety and Security Considerations
- Electrical Safety: Ensure the window is within reach of a three-prong electrical outlet. Never use an extension cord or power strip, as they can overload and cause a fire. It's best to use a dedicated circuit to prevent electrical issues.
- Preventing Falls: Install a support bracket to prevent the unit from falling. Ensure the window is sturdy and can bear the weight of the AC unit.
- Security: Secure the window to prevent it from being opened further from the outside. Install a window lock or steel corner braces for added security.
Post-Installation Checks
- Proper Drainage: Ensure the AC unit is tilted slightly outwards to allow condensation to drain properly. Incorrect drainage can lead to damage, mold, and odors.
- Airflow: Make sure all vents are clear of obstructions. Curtains, drapes, or anything blocking airflow can damage the unit.
- Smart Features: If you have a GE Profile AC unit with smart features, connect it to your home's Wi-Fi using the SmartHQ app. This allows you to control and monitor the AC unit from anywhere.
Maintaining Your GE Profile AC Unit
- Clean the Air Filter: Clean or replace the air filter every 30 to 90 days. Dirty filters can reduce cooling efficiency and increase energy costs.
- Inspect Coils: Regularly inspect the outer coils and clean them with compressed air or a soft brush.
- Check Weatherstripping: Ensure weatherstripping is intact and replace any damaged pieces
By following these steps, you can safely and effectively install your GE Profile AC unit, ensuring a cool and comfortable summer. Regular maintenance and safety checks will keep your unit running efficiently for years to come.
Related Posts
The Most Reliable Appliance Brands for 2024
GE Appliance service rate reflects mostly laundry, some cooking, and French door refrigerators. The more feature-oriented and expensive GE profile line of refrigerators and stoves is their most reliable.
Shop Deals On Kitchen Appliances | Find Cheap New Appliances
Shop Deals On Kitchen Appliances. What is up? You guys, we are going refrigerator shopping, and I'm going to tell you right now I'm about to put you on.
Pink Kitchen Organization Turn
Pink Kitchen Organization. We're back in my pink kitchen because we are going to be doing some more kitchen organization and packing.


Notice: Internet users spontaneously contributed the article content, and the article views only represent the author himself. This site only provides storage services, does not have ownership, and bears relevant legal liabilities. If you find plagiarism, infringement, or illegal content, please contact the administrator to delete it.